github website
Building off my post about using Git & GitHub, this post is about using the GitHub website to initialize repos and get URLs from existing repos to clone them.
Web Interface
Once you sign into GitHub you’re greeted with a page that looks like this:
 Note: Clicking on an image will open it in ths same tab.
On the left-hand side you’ll see a list of your repos. Clicking on any of those links will take you to the repos main page.
In the center are announcements and updates from repos you follow.
On the right are your latest changes and a list of repos that might be interesting to you.
Initializing a Repo
To initialize a repo using the website, you’ll click on the green button on the left that says New. (I boxed it in red in the above photo).
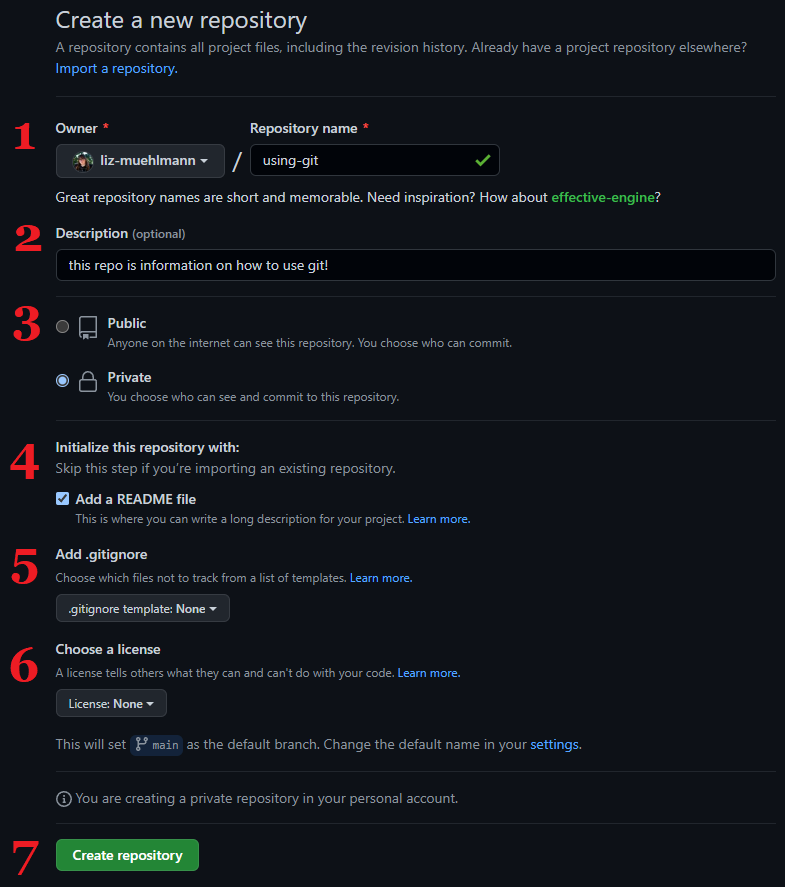
When you click new you’ll be asked to fill in some information:

1:
In the box that opens, you’ll enter a repo name. This should be a descriptive, unique-to-you name for your repo. You can’t have two repos named “project.” Just choose something short and descriptive. Here, I named my repo using-git to store the information related to this post.
2:
The second part of initializing a repo is to give it a description. As it says, this step is optional, but I suggest giving it a useful description. I like to add an overview of what the project is about and what still needs to be done.
3:
Next, you can select whether you want the repo to be public or private. If you want people to see your work and your changes, choose public. If you’re working on data for a paper you want to publish or don’t want to share your code, select private. Most of my repos are private because they are projects I’m working on that I hope to publish.
4:
The README file operates like the description, but in a file rather than just on GitHub. I basically add a README that gives more information including any citations, where to look for other resources, and any other information that’s useful but not vital to the repo.
5:
A .gitignore file is a special file. It tells Git to ignore files and directories listed in the .gitignore document. You can tell git to always skip files with a certain extension. So if you want to share your data but not your R code you can select R from the .gitignore template and GitHub will skip any file with the .R extension.
6:
Fast Company has a good write up on what the licenses mean. I usually initialize with no license because my repos are private. I know creative commons is useful if you’re okay with people having full access to your code and modifying it in anyway they want.
7:
Finally, click Create Repository. Congrats! You now have a new project repo.
Cloning a Repo
Once you create a repo, you’ll want to add it to your hard drive. You can do this with your own repo or one created by another person. The steps are the same.
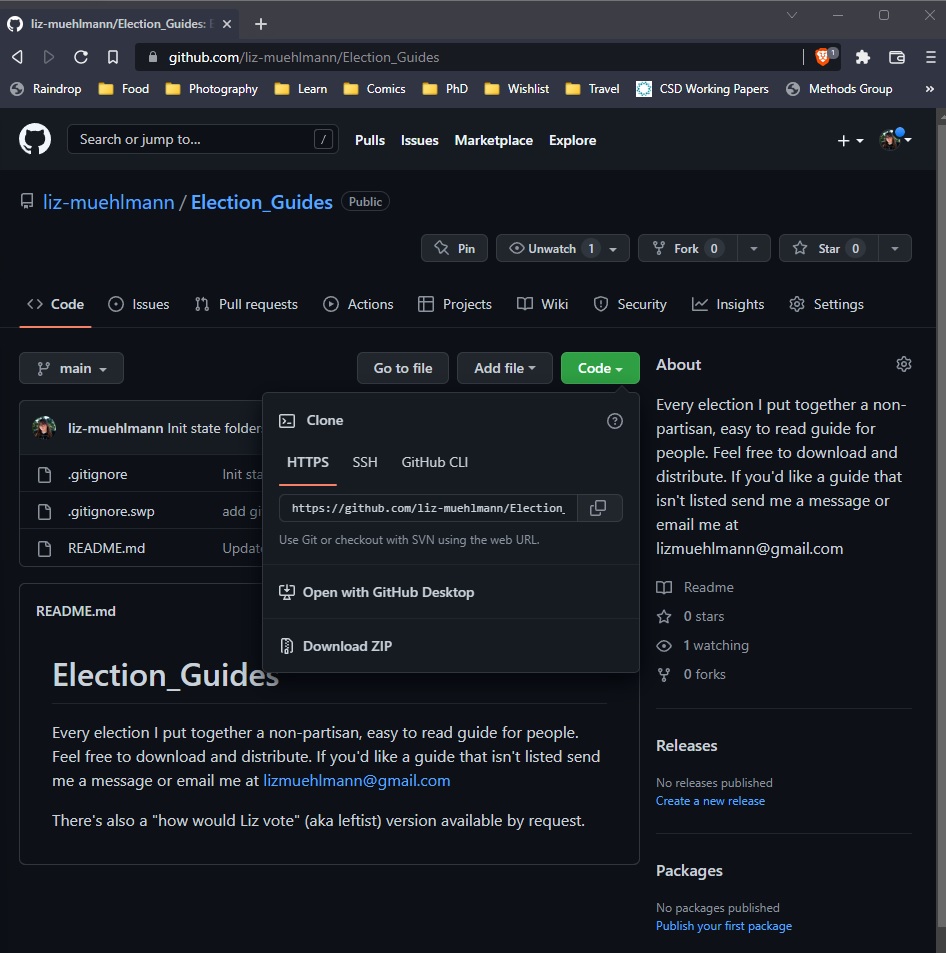
You’ll navigate to the URL of the repo. This will always follow the same format:
https://github.com/[username]/[reponame]. For example, my election guide repo is found at https://github.com/liz-muehlmann/Election_Guides.
To clone a repo to your hard drive you’ll need the repo URL. Click on the green code button and copy the URL under HTTPS.
You can either clone it using command line or Github Desktop
Conclusion
The website is useful because you can find cool projects where people share their code and try to get answers for bugs they’re encountering. A lot of programs people use on a daily basis have project Repos. Some of my favorite extensions and plug-ins have been found by searching online for repos.
For example, Leaflet (the package I use for Cartography) has its own website hosted through GitHub Pages and its own GitHub repo where you can fork the project or submit an issue.
GitHub is a powerful resource and it looks great on resumes as a skill. It looks more intimidating than it is, but you should definitely spend some time using version control.
I have a guide here about using version control via command line and via GitHub desktop
Liz | 17 Sep 2022
